
Never buy another tombstone again
The creepy graveyard is a staple of the home Halloween haunt, but the same old designs can get a little stale. Store-bought tombstones are easy but they just weren’t doing it for me anymore.

This year I decided to liven up the dead space and make a new tombstone of my own.
I found a great YouTube tutorial by master Halloween DIYers Wicked Makers and set out to make this dream a reality.
But, what to make?
One day, inspiration hit me like a bolt of electricity from a dangerously unregulated nuclear power plant.

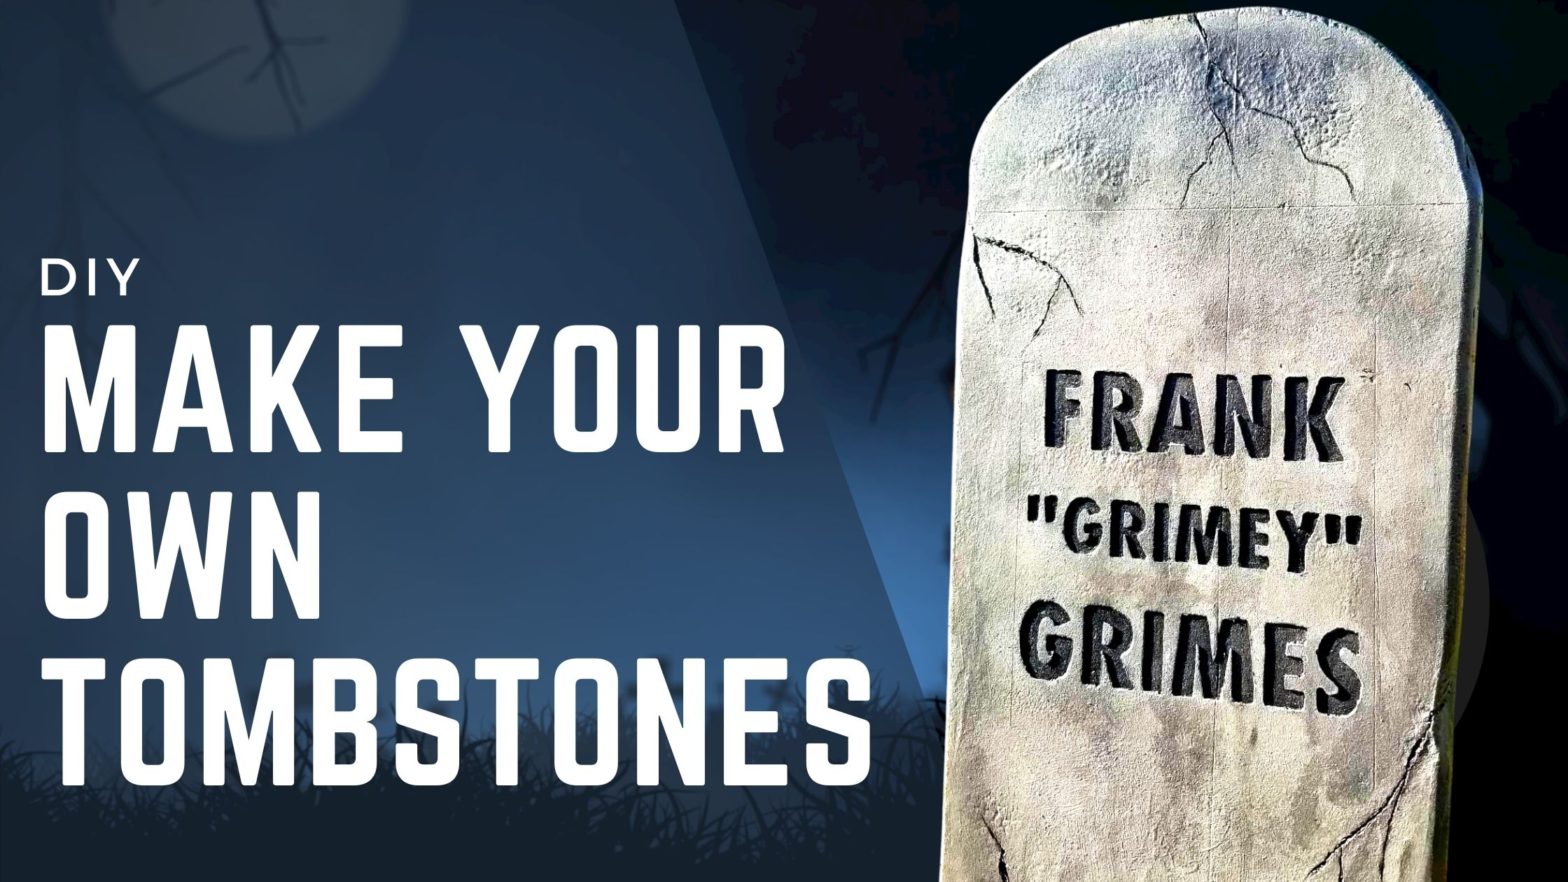
Grimey making a deadly point.
Poor, beleaguered Frank Grimes from “The Simpsons”.
Frank is a polarizing character for fans of the series as he debuts and dies in the same episode. It’s a slow build of tension that explodes into a literally shocking finish. But, for me, the darkness of this episode makes it one of my favorites.
Grimey, it had to be you.
How to make your own tombstones
I used the Wicked Makers tutorial as a guide but altered slightly based on what I had on hand and design preference. Check out the Wicked Makers full tutorial for in-depth info.
Materials I Used
- two-inch thick insulation foam board
- acrylic paints (black, white, bronze, silver, etc.)
- DRYLOCK Masonry Sealer in grey
- water
Tools I Used
- vinyl cutting machine for design template (not necessary, but helpful)
- insulation knife (any utility knife will work)
- heat gun
- paint brushes
- surform tool
- rotary tool (we used a Dremel with a guide to keep the same depth)
- Sharpie/marker/spray paint
- spray bottle
SHAPING THE TOMBSTONE
We got the big boy foam core board – two inches thick, four feet wide, and 8 feet high. We’ll get at least four tombstones out of it.
We traced a tombstone that we already had to approximate the shape and used a compass and ruler to mark the placement of the vinyl template.

CREATING THE DESIGN
You can always get your design on a template by projecting it onto the foam and tracing it. You can also draw it on or cut a template from a printout. I used my Cricut vinyl cutter because it’s pretty easy to design to your specifications and adhere the template right to the foam board.
I don’t always love the Cricut design software, but I had an easy time with this since it’s a straightforward design. I’d say that if you have anything much more complicated, you might want to move to a program with more capability, like Inkscape.

Once I had the placement down, I spray-painted the template and removed the vinyl. You can also use a marker if you don’t want extra paint outside of the design.
CARVING THE DESIGN
The fun part!
I was so scared to use the Dremel to carve out the letters, so I used a spare piece of foam for practice. Once I was happy with the placement of the guide and the bit I was using, I just went for it.

Let me tell you, once I got the hang of it, I wanted to do more! It is so weirdly soothing. I was absolutely in the zone, and it was probably my favorite part of the whole project.
I also took the insulation knife to add cracks to the stone.

REFINING THE SHAPE
The surform tool was new for me, but I’m so glad Wicked Makers suggested it. It made quick work of refining the edges so that the sanding went a lot smoother (no pun intended).
I also used a water bottle to spray the foam and used a heat gun to create areas that look worn down by time.

PAINTING
I thought this would be the fun part, but I was kind of nervous about it for some reason.
The DRYLOCK coat (left) was easy. I suggest you follow Wicked Makers suggestion and do two coats. I did not, and I paid for that later.

I used a black wash then a bronze wash (right) to give the tombstone an aged look. I didn’t know the water-to-paint ratio to use and decided to wing it. It took a few tries to get a consistency I was happy with, and the black and bronze ratios were totally different. I can tell that if I’d used two coats of Drylock I would have achieved a better result. I could tell right away which areas had less coverage than others.
I filled in the letters with black and dry brushed silver over raised areas for highlights. The silver really helped give the cracked “stone” more dimension and made the letters pop.

THE FINAL LOOK
The final look isn’t uniform, but that’s OK, and kind of a good thing. My Halloween prop philosophy has always been, “if it looks kinda messed up, it adds to the effect”.
Grimey took his place out here in our little cemetery, under the watchful eye of Pelvis Costello (our beloved 12 foot-skeleton we scored last year from Home Depot).


I love how this turned out. I eventually want to replace most of my generic tombstones with my own pun-filled and pop culture-laden creations!
What’s next?
What tombstones should I create now?
Should I go with the classic puns like “Ben Better” and “Anita Moore-Tishan”?
Or should I go the pop-culture route, like Sam and Dean from “Supernatural” with a bunch of death dates crossed out, or recreate Buffy the Vampire Slayer’s tombstone (“She saved the world. A lot.”)
Share your ideas in the comments!